Building a successful fire when you don't have matches available can be a valuable skill. In this blog, we will cover the different methods of starting a fire, the necessities of a successful fire, some handy portable items to make starting a fire easier, and how to keep that fire going.

When Philip (my husband) was a young teenager, a gentleman in his church, who was very experienced in wilderness survival, took a large group of men and boys camping. They hiked to where they would camp, and roughed it for the evening. The man showed them several survival techniques to use while in the wild, but the one that stood out the most to my husband was the different ways to start a fire without matches. He shared with me some of the techniques he was shown, and it inspired this post. We wanted to share the different ways that it is possible to start a campfire when matches just aren't an option. This could be due to them getting wet on a camping trip, or it could be due to getting stranded and you need a way to stay warm. Whatever the cause, we hope this post helps teach you something new about building a successful campfire.
Items Needed:
To build a successful campfire, with or without matches, there are a few things you will need.
- Spark
- Tinder
- Fuel
- Structure
Spark:
A spark can be an actual spark, or an ember. I use "spark" loosely to refer to the source of the fire. It can be created a variety of ways. Some of these ways are: friction, reaction and solar energy, the most common of these is friction.
Friction:
Methods that use friction using wood are: the bow method, the fire plow, and the hand drill.
The bow method is achieved by using a flat piece of wood (fireboard) with a small hole (socket), just large enough for the pointed end of a stick, (spindle) to fit snug. A notch is cut next to the hole for the ember. A shoelace or a piece of string is tied to both ends of a bowed stick (bow). You will also need a small block of wood to hold the spindle in place while the bow is in movement (bearing block). The spindle and bow need to be thinner sticks, yet they need to be sturdy enough to withstand the force of the sawing motion to create the friction, you don't want to use twigs, use a good solid stick. The fireboard needs to be a good sound piece of wood, the best types of wood to use are cottonwood, juniper, willow, cedar or cypress. These woods ignite the best. The string is wrapped all the way around the spindle, the spindle tip is placed in the hole of the fireboard. Using the bearing block, apply pressure to hold the spindle in place, and use a sawing motion with the bow to make the spindle turn. You will have to move it pretty quickly to create enough friction to heat the wood and create an ember. This ember is the beginning of your fire! You will want to have a tinder bundle (we will cover this later) ready to place the ember in to help it grow into a fire.
The fire plow method has a variety of techniques. The basics of this method however, are the same. You will want two pieces of sturdy wood, a stick made of hardwood and a board made of softwood. Cut a notch for the track of the stick you will be moving, and to allow air to flow through and create an ember. Then, vigorously rub the stick at roughly a 45' angle in the track of the board. The action of quickly rubbing back and forth will create the friction needed to heat the wood and create an ember for your fire. You will want a tinder bundle at the end of the board to catch the ember and start your fire.

Bow Method

Fire Plow
The hand drill method, is perhaps the most difficult of these, although it is still a viable option. It is much like the fire drill, except, instead of using a bow to twist the spindle back and forth, you use your hands. You will need a fireboard and a long, straight stick for a spindle, and a notch cut into the fireboard, Have your tinder ready to catch the ember, then place the spindle between your hands, and vigorously rub your hands together as though you were trying to warm them. You want to apply pressure as you do this, so your hands will travel down the spindle as you rub, just stop and adjust when you reach the bottom of the spindle and repeat this processes until there is an ember.

Hand Drill
There are other methods of starting fires using friction. One of these is quick striking. Quick striking can use things such as; ferro rods, flint & steel, even some rocks will give a spark when hit together.
Ferro rods are made from ferrocerium, a synthetic alloy that emits hot sparks when rapidly oxidized through striking it. You can typically shave some of the rod into the tinder bundle to create a mini fuel source, then strike quickly with the back of your knife or the metal striker that came with the rod to create a spark and ignite the shavings in your tinder bundle.
Flint & steel are used by just striking the steel striker against the flint quickly to create a spark to ignite your tinder. It works much the same way as a ferro rod, except flint is a naturally occurring rock. The steel can either be the steel striker, or the back of your knife..

Ferro Rod with Striker

Flint Rock and Steel Striker
(Available at flint-and-steel.com )
Reaction:
The most commonly used method of reaction to start a fire is using some steel wool and a battery. The really fine steel wool works best for this method. By touching the steel wool to the positive and negative parts of the battery, the steel wool will ignite. This can be done with 9V batteries, regular single cell cylindrical batteries (AA style), or even a large battery for a vehicle. If using a 9V battery, simply touch both posts to the steel wool (have your tinder ready!) it will ignite very quickly! If using the cylindrical style of battery, roll the steel wool into a longer piece to reach both ends of the battery. Carefully touch the ends of the steel wool to both ends of the battery. If using a vehicle battery, if possible, use battery cables to touch the steel wool, but be careful not to touch the cables together!
The steel wool can also be used in the flint & steel or ferro rod methods. It provides a speedy reaction to the spark!

Using a 9V Battery and Steel Wool
Solar Energy:
Even though there are several ways to harness the the power of the sun to start a fire, they all work basically the same way. Whether it is a magnifying glass, mirror, or a water bottle, the idea is to concentrate the sun beam to a small spot in the tinder pile for it to ignite. This focuses the sun's energy to that one spot and can generate a significant amount of heat to start a fire. I think at one time or another we all have experimented with this method as kids, using a magnifying glass, or parent's glasses to light leaves on fire in the back yard. Other items that can be used in this method are: eyeglasses, plastic bags filled with water, the bottom of a soda can, even a 2" block of ice can be smoothed and used as a lens for the solar method.

Starting a Fire with a Magnifying Glass
Tinder:
Tinder is what will transform your ember to a fire. Regardless of the spark method you choose, or have the ability to do, it is imperative to have a good tinder ready for that spark to ignite. Without tinder, the spark will be useless. The tinder needs to be airy (not too dense), dry, and flammable.
Some common options are; leaves, wood shavings, cattail fluff, dry grass, cedar bark, and if you came prepared, char cloth. Some items not often thought of for tinder, but would work if in a pinch are; tampons, feminine pad filling, and even pocket lint.
If the conditions you are working in are wet and rainy, use a knife or sharp rock to peel the bark off a large branch or log, then, once you get to dry wood, shave pieces off to make dry tinder. Don't let this tinder get wet, or it will not ignite. Make sure the wood is not pithy, or rotten, it will not burn properly.
You want to collect your tinder in a dry, flat area that your fire will be located at. Make sure it is not too close to a shelter or low hanging branches, you do not want to create a wild fire.

Dry Tinder Bundle

Cattail Fluff for Tinder
Fuel:
Before you have your tinder bundle burned up (this can happen quickly) you will need to feed the fire. Begin with small dry sticks, small fallen branches, or even leaves and pine cones to help build the fire large enough to be able to add a larger piece of wood. If you are not in the woods, you can use bundles of dry grass, and even dried animal droppings will burn! It may not smell the best, but it will burn enough to keep you warm in an emergency!
You will want to gather larger pieces of dry wood to feed the fire once it is established. If the wood in your area is wet, use a knife or sharp rock to strip away the wet bark and expose the dry wood beneath.

A Pinecone in a Fire

A Rough Cross Hatch
A Teepee of Small Sticks
Structure:
Once you have your spark method figured out, your tinder bundle gathered, and your fuel ready for your fire, you can put it all together and get your fire built!
Have your tinder bundle close at hand and your spark method ready. Once an ember is created, carefully and gently blow on it inside the tinder bundle to create a flame, this increases the airflow and feeds the ember. Allow it to grow until you know it is burning well, then place the tinder bundle where you want your campfire to be located. With small sticks, carefully build either a cross-hatch style, or a teepee style structure for your flames, you want to put wood on the fire, and yet keep good air flow. This will help feed the fire without smothering the flames. If you put too much wood directly on the young flames, the flame will smother out and you will have to start over. Once the fire is burning the sticks you have placed on it well, and there are extra coals or embers in the base of the fire, then you can place larger pieces of wood on the fire to burn.

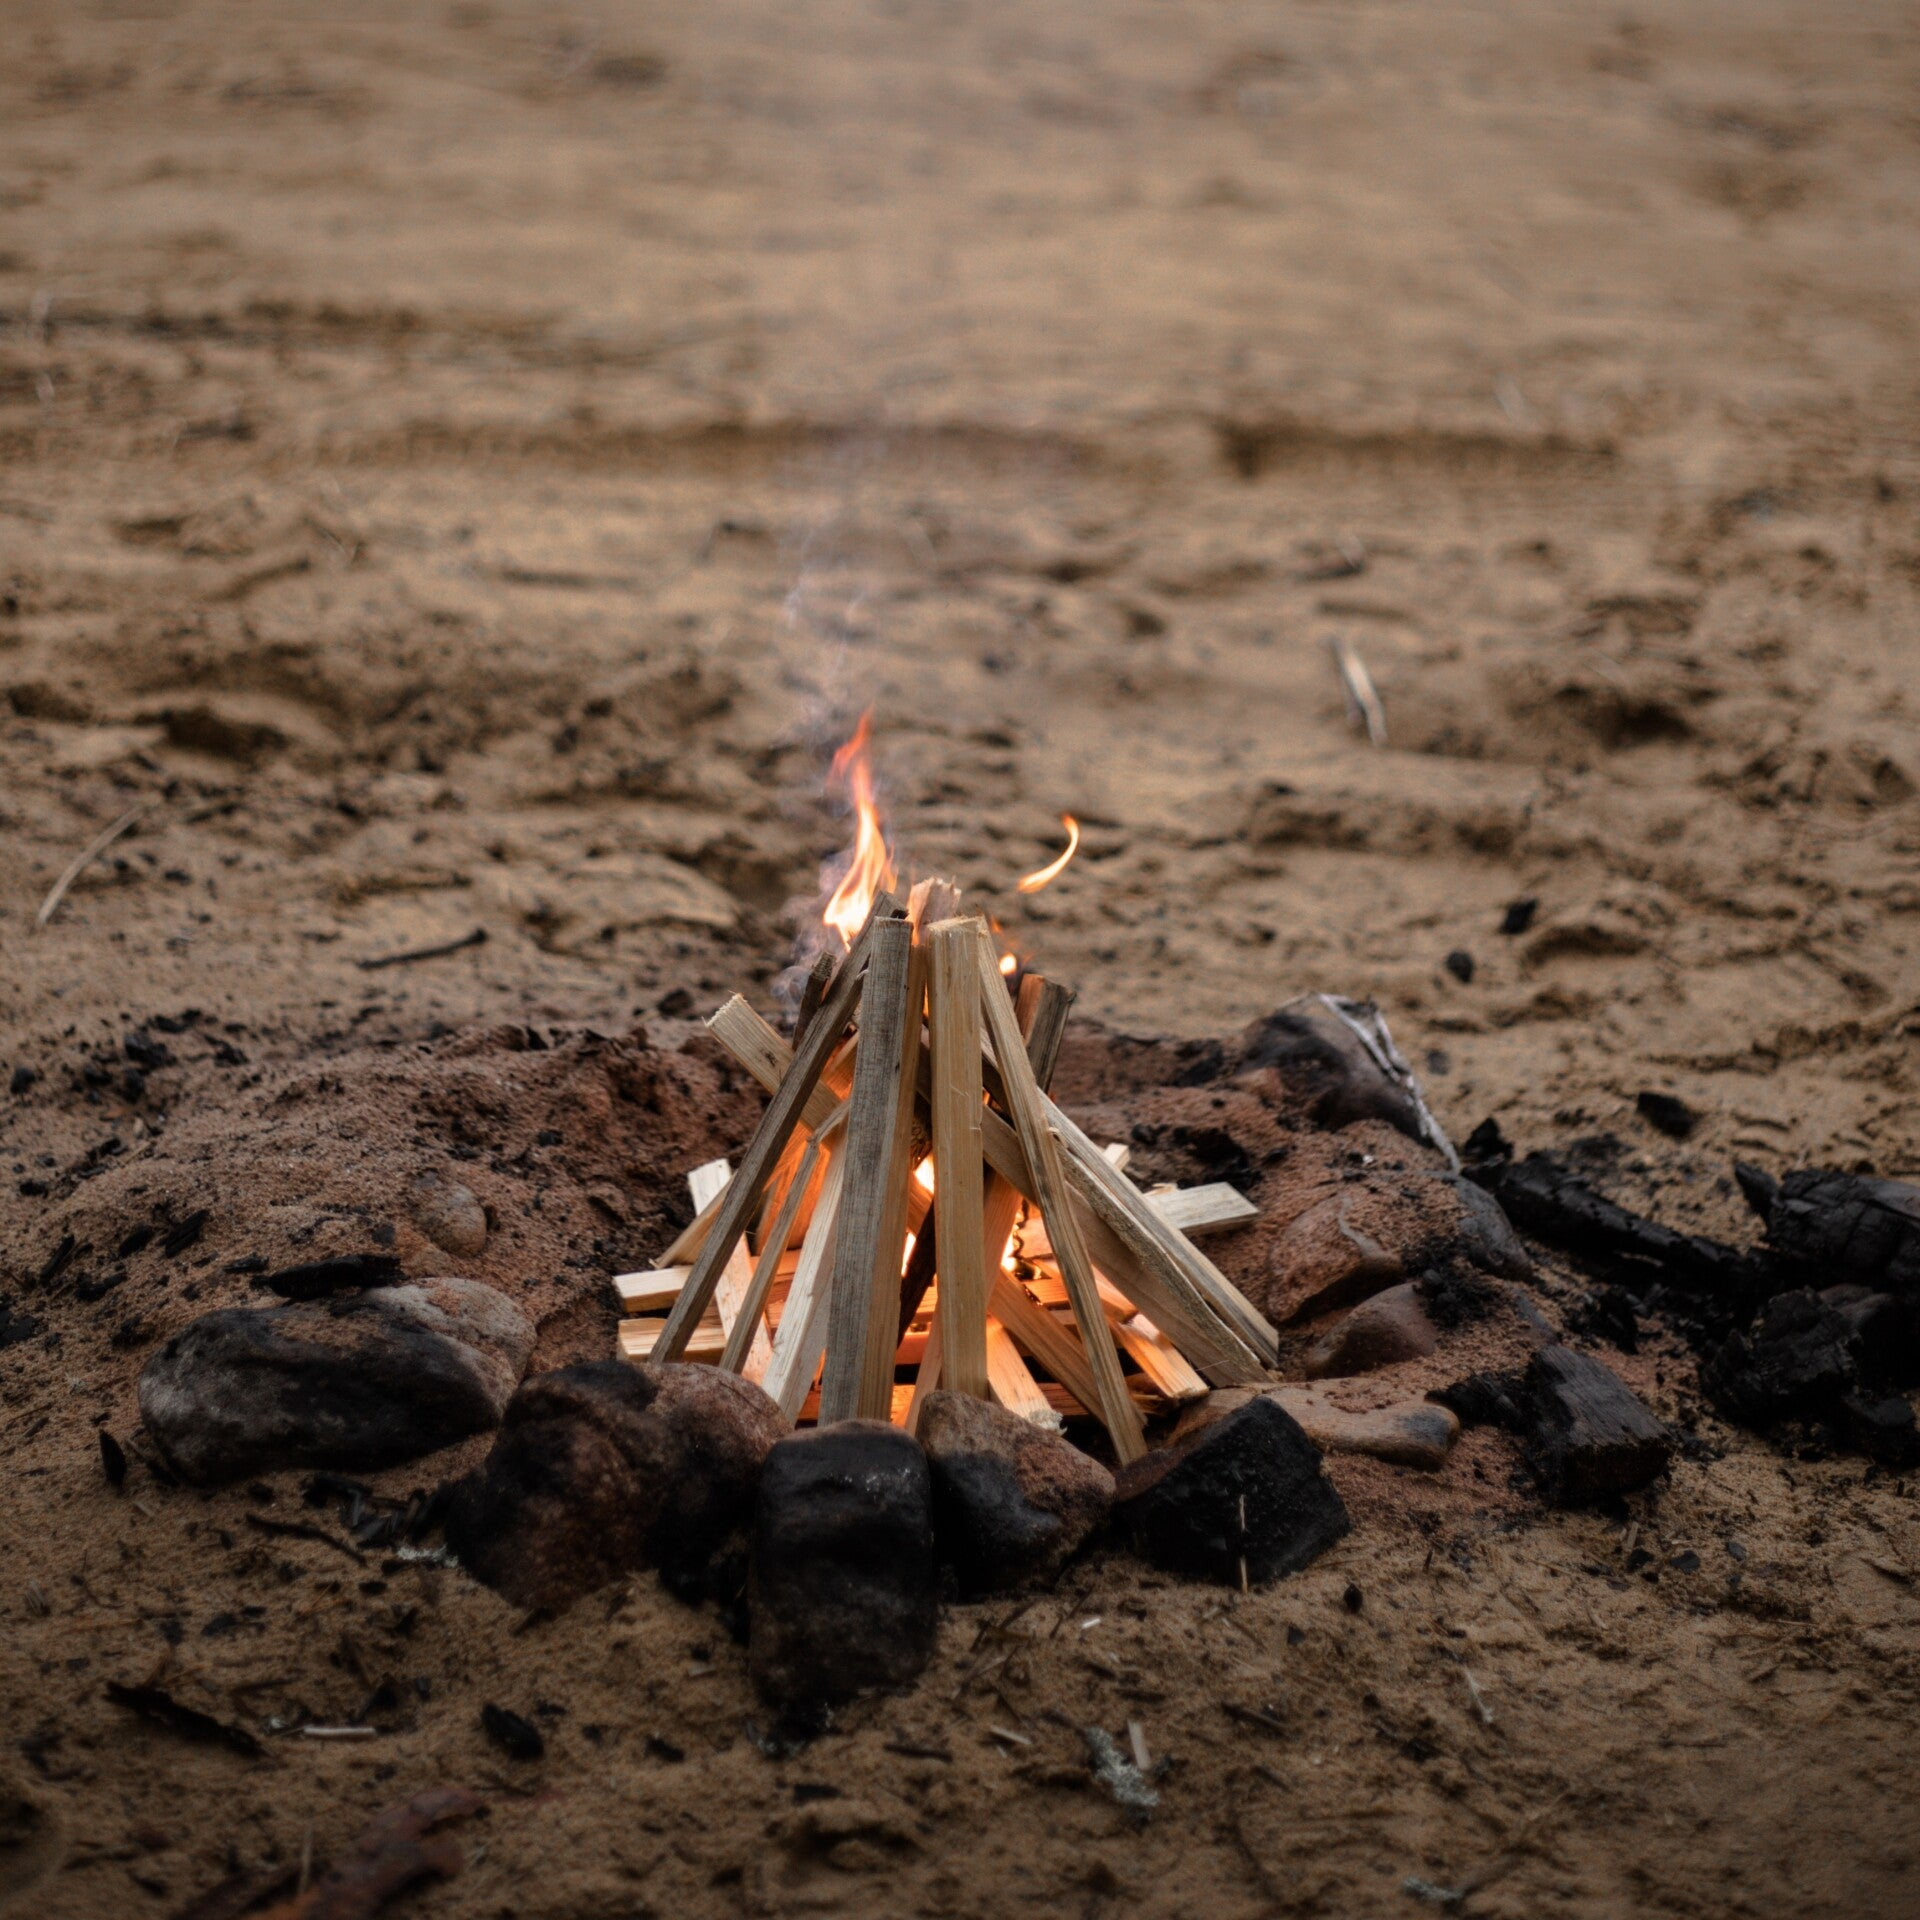
A Well Built Fire
For more instruction on building a fire in wet weather conditions, I recommend visiting Coalcracker Bushcraft on YouTube. He has a great video there with step by step instructions. If you click on the link above, it will take you directly to his video!
Extras:
There are a few things that are great to have on hand, either in your emergency kit, or camping gear that will make starting a fire in an emergency even easier are:
Permanent Matches-
- A permanent match is much like a lighter in concept but the idea is that it starts a fire without having to throw away a single stick. Compared to regular matches, a permanent match has many advantages. For instance, it will light up even when the storm is bad, when the weather is cold, or when the rain is pouring badly.

Permanent Match
Fuel Pads-
- Fuel pads can easily be made using cotton rounds (used for makeup removal), gulf wax, and lighter fluid. By melting the wax, then adding equal parts lighter fluid it creates a safe medium to soak the cotton rounds in. The wax dries and holds the fuel inside the pad, making it waterproof as well. Simply store in airtight container or bag, ready for use. When ready to use, slightly tear the pad to expose the inside and apply spark method. These work will with any spark method, ignite quickly, and burn for a long time.

Burning Fuel Pad
Char cloth-
- Char Cloth is basically a form of tinder, usually made out of heat-treated cloth textiles, that has a very low ignition point and a very long burn time. It can be created easily with cotton cloth, a small tin container with a pin hole, and a fire. Once made, it can easily be carried with you in a backpack for quick use. Char cloth ignites quickly and is especially useful with the flint and steel method.

Char Cloth in a Tinderbox
Whatever the situation that a fire is needed, I hope this post has been helpful in teaching the basics of igniting, nurturing and building a successful campfire!
Campfires can be a source of so many great family memories, they don't just have to be in the middle of the woods in an emergency, or even on a camping trip. A good campfire can also just be in the backyard, with everyone gathered around with sticks and marshmallows! Kids love to tell stories around the fire, and honestly, most adults do as well. The methods mentioned in this post can be practiced right in your backyard firepit, get used to the methods before they are needed, and you will be more confident if the need arises.
If you have a get together with friends, have a fire-builder challenge! Whoever can start the campfire first, without matches, doesn't have to help clean up, or wins a small something. Make it fun!

Add comment
Comments